This chapter contains the following topics:
Introduction to the Collections Report
The Collections report selection enables you to provide a report showing your customer’s account balances by aging period.
The aging method used here is identical to the Aging Report. (Refer to the Aging Report chapter, regarding aging methods for balance forward and open item customers.)
Collections Report differs from the Aging Report in that invoice balances include all documents received up to the date the report is printed.
The report is useful in two ways:
| • | It may be used as an aid to the Collections Department in following up on customers with past-due payments. |
| • | It may be used as a sales tool to show which customers have credit balances, so that sales representatives could contact these customers for sales leads. |
You can either define aging periods by days (0-30 days, 31-60 days, etc.) or by specific dates (3/15/90 to 4/10/90, 2/28/90 to 3/15/90, etc.).
Use the default aging periods entered in Control information or enter period definition for this report only.
The Collections Report shows the amount each customer owes in each of these aging periods.
Specify whether you want the Collections Report to show item detail (in two possible formats) or to show summary information only.
The report title will print as either the Collections Detail Report or Collections Summary Report, depending your selection for the Detail or summary field. A sample Collections Detail Report is in the Sample Reports appendix.
Select
Collections from the Reports, general menu.
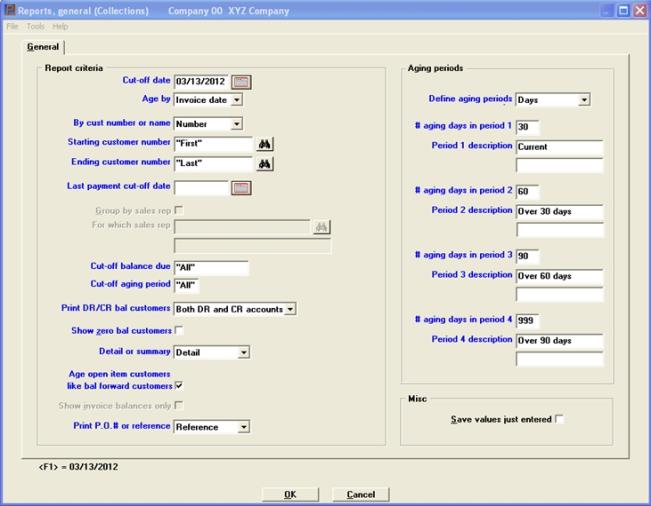
The following screen appears:
Graphical Mode

Character Mode
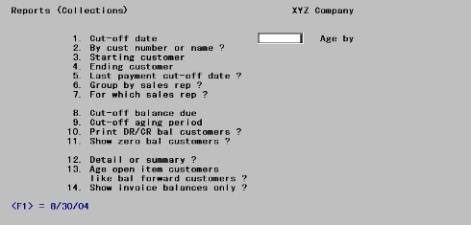
If you have saved the screen entries in a previous run (not necessarily in this session), you may use the option.
Options
Use the following option:
|
<F2> |
To restore the previous screen entries. They all display and you may change individual entries from Field number to change ?. |
Otherwise, enter the following information:
Enter the date to use for calculating the age of items for collections purposes, or use the option.
Options
Use the following option:
|
<F1> |
For today’s date |
|
Format |
MMDDYY |
|
Example |
Type 43005 |
The Collections Report is usually run using the current date as the cut-off date, with the documents aged by due date. When the report is run in this fashion, the Collections Report may be used to determine what receivables are overdue. To determine what receivables are coming due in the future, use the Cash Projection Report (refer to the Cash Projection Report chapter.
If you run the Collections Report by invoice date, then the cut-off date would usually be set to be the end of an accounting period. Run in this fashion, the Collections Report is actually being used as an Aging Report and will show outstanding receivables as of the cut-off date. Alternatively, you may use the Aging Report (refer to the Aging Report chapter) to obtain similar results.
Type I to age open items by invoice date or D by due date. When aging by Due date read Including Items Past Cut Off Date for more information.
|
Format |
Graphical: Drop-down box. Invoice date or Due date. Character: One letter, either I or D. The default is I. |
|
Example |
Type D |
Type 1 to print the open items in order by customer number, or 2 by customer name. If you select customer name order, you can print customers in order by sales representative.
|
Format |
Graphical: Drop-down box. Either Number or Name. Character: 9 |
|
Example |
Type 1 |
Starting customer number and
Ending customer number or Starting customer name and Ending customer name
Enter the range of numbers or names (whichever you have specified) for which you want to print the report. At each field you may use one of the options.
Options
You may use the following option:
|
<F1> |
To toggle between entering a personal name and a corporate name (if selecting customers by name) |
|
<F2> |
For the First starting customer number or name, or the Last ending customer |
|
Format |
12 characters (if entering customer number) 25 characters (if entering corporate name) Two subfields: (if entering a person’s name) 14 characters for surname 10 characters for personal name |
|
Example |
Type 200 for starting customer Type 300 for ending customer |
If you want to exclude customers who have paid since the cut-off date entered in Field #1, enter a last payment cut-off date here. Only payments received on or before this date will count in determining overdue items.
Options
You may use the option:
|
<F2> |
Graphical: Check box where checked is Yes and unchecked is No. Character: N For no cut-off date |
|
Format |
MMDDYY |
|
Example |
Press <F2> |
If you selected to print in customer number order, or if you chose in
Control information not to use sales representatives, this field displays as Not applicable and may not be entered.
Otherwise, answer Y to print the open items in order by customer name within sales representative, or N to print in straight customer name sequence.
|
Format |
Graphical: Check box where checked is Yes and unchecked is No. Character: One letter, either Y or N |
|
Example |
(Does not occur in this example) |
If Group by sales rep?is N or Not applicable, this field also displays as Not applicable.
Otherwise, enter the code of the sales representative whose customers you want to appear on the report, or use the option.
Options
You may use the option:
|
<F5> |
For All sales representatives |
You may enter a sales representative even though that code is not on file in Sales reps. Customers are selected for inclusion on the basis of the current sales representative on file for them in Customers, but sales made to those customers within the specified time frame are included on the report even if made by a different sales representative.
|
Format |
3 characters |
|
Example |
(Does not occur in this example) |
Cut-off balance due and
Cut-off aging period
These fields let you print the report for only those customers whose balance due is older and greater than some threshold.
The customer will be printed if the total balance due in the cut-off period, plus all higher-numbered periods, is at least as much as the cut-off amount. (The periods referred to have not been entered yet but will be entered on the next screen).
For instance, if you entered 1000 as the cut-off balance due, and next entered 2 as the cut-off aging period, only those customers would be included in the report who owe a total of $1,000 or more in aging periods 2, 3, and 4.
Options
In Field #8 you may use the option:
|
<F5> |
For All customers regardless of balance due. Field #9 then displays as Not applicable. |
Options
In Field #9 you may use the option:
|
<F5> |
For All periods |
|
Format |
999,999,999,999 for cut-off amount. Zero is not a valid entry. A digit from 1 to 4 for cut-off period |
|
Example |
Press <F5> for All |
If you entered a cut-off balance due in Cut-off aging period, this field defaults to DR accounts only and may not be entered.
Otherwise, choose among:
Options
You may use the option:
| Character | Graphical | |
|
D |
DR accounts only |
to print only customers with a debit balance as of the cut-off date on the first screen |
|
C |
CR accounts only |
to print only those with a credit balance |
|
B |
Both DR and CR accounts |
to print both |
|
Format |
Graphical: Drop-down box Character: One letter from the above list. There is no default. |
|
Example |
Type B |
If you entered a cut-off balance due in Cut-off balance due, or if you entered either D or C in Print DR/CR bal customers, this field displays as Not applicable and may not be entered.
Otherwise, answer Y to print the report for customers having a zero account balance, or N to omit such customers.
|
Format |
Graphical: Check box, where checked is Yes and unchecked is No Character: One letter, either Y or N. There is no default. |
|
Example |
Answer N |
Type D to print a detailed report. This shows all items for each customer, as well as the aging balances.
Type S for a summary report. This shows the total account balance for each aging period, but not the detail.
The report title will print as either the Collections Detail Report or Collections Summary Report, depending your selection for this field.
|
Format |
Graphical: Drop-down box. Detail or Summary. The default is Detail. Character: One letter, either D or S. The default is D. |
|
Example |
Press <Enter> |
Age open item customers like bal forward customers
Answer Y to age open item customers the same as balance forward customers. In this case, the documents for open item customers are aged individually. Answer N to treat all documents for the same apply-to number as a unit.
|
Format |
Graphical: Check box, where checked is Yes and unchecked is No Character: One letter, either Y or N. There is no default. |
|
Example |
Answer N |
If you answered Y to the previous question, this field displays as Not applicable and may not be changed.
Otherwise, answer N if you want to view all documents relating to an invoice, or Y to show invoice balances only.
|
Format |
Graphical: Check box, where checked is Yes and unchecked is No Character: One letter, either Y or N. There is no default. |
|
Example |
Answer N |
This field appears only if you are printing a detail report.
If so, type P to print the purchase order number for each overdue item, or R to print the reference.
|
Format |
Graphical: Drop-down box. P.O. number or Reference. Character: One letter, either P or R |
|
Example |
Type R |
Make any needed changes, then press <Enter>.
A second screen then appears for you to define aging periods.
If you have saved the screen entries in a previous run (not necessarily in this session), you may use the option.
Options
You may use the option:
|
<F2> |
To restore the previous screen entries. They all display and you may change individual entries from Field number to change ?. |
If you have not saved the screen entries, you may use the option.
Options
You may use the following option:
|
<F2> |
For the aging periods from Control information |
Otherwise, enter the following information:
Type D to define aging periods by days, S to define them by specific dates, or use:
|
Format |
Graphical: Drop-down box. Days or Specific dates Character: One letter, either D or S. There is no default. |
|
Example |
Type D |
The remainder of the screen varies considerably depending on your response to Define aging periods. Each case is considered separately.
Regardless of which method you choose, it is possible to define your oldest aging period in such a way that some open items on the report will be even older than the oldest period. Such line items will not be included in any aging period of the summary.
Similarly, if you are aging by due date instead of invoice date, it is possible for the due date of some open items to be still in the future, and so those items will fall off the aging totals on the other end.
Aging Periods By Days
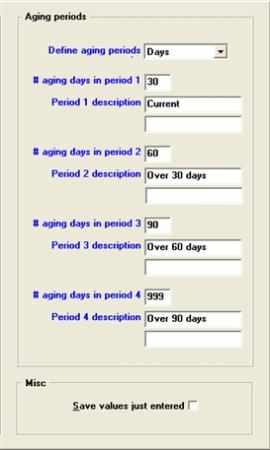
If you requested Aging periods by days, the screen now appears as follows (If you entered S for Field #1, skip ahead to the next section).
Graphical Mode
Character Mode
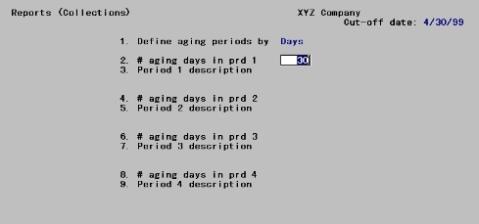
Fields are entered in numeric sequence, but to avoid much repetition similar fields are described together.
Enter the following information.
# aging days in prd 1
# aging days in prd 2
# aging days in prd 3 and
# aging days in prd 4
Period 1 is the most recent. Days must be in ascending order.
Despite the caption, what you enter here is not the number of days in each period. Instead, enter how many days it has been since the period ended, measuring backwards from the cut-off date entered on the first screen and displayed in the heading of this screen.
By convention, 999 represents all dates 999 or more days ago. This is usually entered in Field #8.
| • | If you want fewer than four aging periods, enter 999 for Period 3 or 2 in addition to Period 4. |
| • | If the highest number entered is less than 999, transactions older than that number of days will not be included in the report at all. |
|
Format |
999 at each field. The default is the number of days for this period in Control information |
|
Example |
Press <F2> |
Period 1 description
Period 2 description
Period 3 description and
Period 4 description
Enter a brief description of each aging period to print on the report.
Options
At each field you may use the option:
|
<F2> |
For the default description for this period in Control information |
|
Format |
At each field, two lines of thirteen characters each |
|
Example |
Press <F2> |
Field Number To Change ?
Make any needed changes, then press <Enter>.
You may select 1 to review your entries (both on the previous screen and on this one), or select 2 to print the Collections Report. If you select to print, you then have the option of saving your entries to use the next time you print the report.
Aging Periods By Specific Dates
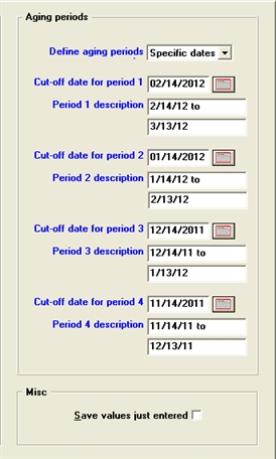
If you requested aging periods by specific dates in Field #1, the screen now appears as follows (if you entered D for Field #1, refer to the preceding section).
Graphical Mode:
Character Mode:
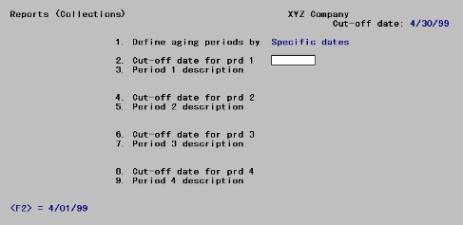
Enter the following information. Fields are entered in numeric sequence, but to avoid much repetition similar fields are described together.
Cut-off date for prd 1
Cut-off date for prd 2
Cut-off date for prd 3 and
Cut-off date for prd 4
These are the starting dates of each period. Period 1 is the most recent.
The ending dates are automatic and are not entered. Period 1 ends on the cut-off date entered on the first screen and displayed on the heading of this screen. Periods 2, 3, and 4 each end one day before the next period starts.
Enter the cut-off (starting) date for each period.
Options
For Period 1 you may use the option:
|
<F2> |
For a date thirty calendar days (not one calendar month) earlier than the cut-off date entered on the first screen and displayed in the heading of this screen. |
Options
For Periods 2 and 3 you may use the option:
|
<F2> |
For a date one calendar month (not thirty days) earlier than the next period’s cut-off date. Dates at the end of a month are adjusted as necessary to allow for varying lengths of months. |
Options
For Period 4 you may use one of the options:
|
<F2> |
For a date one calendar month (not thirty days) earlier than the next period’s cut-off date. |
|
<F5> |
For Unlimited (meaning an infinitely remote date) |
|
Format |
MMDDYY |
|
Example |
(This screen does not occur in this example because you entered D for Field #1) |
Period 1 description
Period 2 description
Period 3 description and
Period 4 description
Enter a description of each period. At each field you may use the option.
Options
You may use the option:
|
<F2> |
For <mm/dd/yy to mmddyy>, where mm/dd/yy represents a date and the two dates are the starting and ending dates of the period as described above. If <F5> was chosen in Field #8, pressing <F2> here results in <Older than mm/dd/yy>. |
|
Format |
At each field, two lines of thirteen characters each |
|
Example |
Press <F2> |
Make any needed changes, then press <Enter>.
You may select 1 to review your entries (both on the previous screen and on this one), or select 2 to print the Collections Report. If you select to print, you then have the option of saving your entries to use the next time you print the report.
You may see a message similar to the following:
Calculate Past Due Amounts has not been run since 99/99/9999
Do you wish to continue ?
This message appears, with a date substituted for the 99/99/9999, if the past-due calculation has not been run today, indicating that the Past-due amt shown in the report will not be current (the aged amounts by period will still be correct). Answer Y to continue or N to cancel.
Including Items Past Cut Off Date
When aging by due date, it is sometime useful to include items which are past the cut-off date.
In order to include items past the cut-off date, you would move the cut-off date forward in time to the last date on which a receivable can be expected to be due, and then use the second parameter screen to control the cut-off periods appropriately. For example, if the cut-off date is July 31, 2016, and you know that there are no receivables posted which are due (based on the normal terms given by the company) after Sept 30, 2016, you would set the cut-off date as Sept 30, 2016. Then, using the second parameter screen, you could set your period cut-offs as follows:
|
Period 1 cut-off: |
July 1, 2016 |
|
Period 2 cut-off: |
June 1, 2016 |
|
Period 3 cut-off: |
May 1, 2016 |
|
Period 4 cut-off: |
(Unlimited) |
With this setup, all receivable due from July 1st through Sept. 30th will appear together in the first bucket, all receivables due from June 1st through June 30th will appear in the second bucket, all receivables due from May 1st through May 31st will appear in the third bucket, and all receivables due on or before April 30th will appear in the fourth bucket.